Saturday, 28 May 2011

4.2 PTR - Alysrazor Testing and New Mastery Power Aura


I'd hoped to have a fair few more raid previews from the PTR, but a mixture of bugged encounters, rescheduled testing, and just fellow raiders having issues getting onto the PTR (and staying connected), the only real preview of interest is a look at Alysrazor.

For those of you who quested in Hyjal, you may remember the Green Dragon Alysra - we deliver the prisoner Arch Druid Staghelm to her (which apparently seems to have been a bad idea). It seems she has joined the ranks of Ragnaros along with Staghelm (who we will also face in Firelands).

The fight itself is quite fun. She drops molten feathers which players can pick up, increasing their movement speed and allowing them to cast while moving. If you pick up three, you'll gain Wings of Flame and be able to fly up into the air. There are fiery rings to pass through while in the air which give you a haste buff and allow you to stay in the air.

Meanwhile there are adds to deal with on the ground, so any DPS not chasing her in the air can assist on those. There are humanoid adds which cast brushfires, basically balls of moving flame, so killing those adds keeps the ground from becoming covered with fire. There are also two Hatchling adds which the tanks have to manage. Lava worms spawn out of the ground and you kite the hatchlings to the worms to feed them to prevent them from gaining a damage buff.

Our bear tank, Reesi (of The Inconspicuous Bear), frapsed our 10 man kill, so you can get a glimpse of the fight here!


I'll leave the preview at that as I expect there'll still be a lot more tuning and adjusting to the fight. The 10m version felt a bit undertuned so it will likely in the very least be buffed some.

New Resto Mastery


The new Resto mastery (Harmony: Increases direct healing by 10% and your direct healing spells grant you a 10% bonus to your periodic healing for 10 sec. Each point of mastery increases each bonus by an additional 1.25%.) has been implemented on the PTR, and it does indeed proc a buff on you. This will help immensely in keeping track of the Mastery and ensuring we maintain good uptime on it.

I do feel the actual time of it could be increased. A 15 second duration would be nice, however, that may seem a bit too easy for Blizz to want to implement, as it could easily be refreshed by simply Swiftmending on cooldown, which could quickly become a mindless auto-cast without any real thought. This is obviously trying to encourage our direct heals along with our HoTs, which is good. The 10 second duration should be very maintainable in 5mans and likely 10mans, where there's plenty of direct healing going on along with raid healing. In 25s I could see this being a bit trickier, particularly for those druids who are focussed primarily on raid healing rather than necessarily tank healing. If refreshing the Mastery with a Nourish or Healing Touch, that's essentially 2-3 seconds of the buff spent simply refreshing it. You could arguably refresh with a faster Regrowth, particularly if you have an OoC proc, but that seems like it might just encourage poor and random Regrowth use.

A 12 second duration for the buff seems like it may be a good balance. Not too long that it could be so easily refreshed by just spamming Swiftmend, but long enough that you don't feel your constantly having to refresh it.

Regardless, having a means to track the buff will be essential for keeping good uptime on it. Power Auras Classic is great for this, and I've made a Power Aura (which you can edit to your liking) to track the buff. Keep in mind, this only works on the PTR for the moment, as the new Mastery won't be live until 4.2.

The import code is this:

Version:4.19; b:0.0549; g:0.4863; icon:Spell_Nature_HealingWay; buffname:Harmony; r:0.1843; x:-85; customname:Harmony; texture:23; alpha:1; inVehicle:0; wowtex:true; combat:true; size:0.25; y:-160; ismounted:0; timer.b:0.9294; timer.h:2; timer.Texture:WhiteRabbit; timer.enabled:true; timer.r:0.9882; timer.cents:false; timer.Relative:CENTER; timer.UseOwnColor:true


The Aura itself looks like this (seen with my full Resto power aura setup):

The Harmony aura is the leaf on the left hand side with the timer - this way you can see the buff is active and also how much time is remaining on it so you can refresh it as needed.

My full set of Resto power aura codes are available in my post here: My User Interface / Addons.

Enjoy! :D

Friday, 13 May 2011

4.2 Mastery change, Innervate nerf, and PTR Raid Testing


Patch 4.2 is under testing on the PTR and the news keeps rolling in! While everything is still very much subject to change, there are some interesting changes slated for Druids already, including a new Mastery for Resto and a very significant change to how Innervate works. We've also had two of the new Firelands bosses up for testing and I've got some cool screenshots of those as well! As you can see in my screenshot above, the new Firelands zone looks awesome. That shot is actually taken inside the instance - it's a massive zone, and you can mount up to ride to each boss.

New Resto Mastery
There was a recent blue post with 4.2 patch notes which included this gem:

'Symbiosis (Mastery) has been removed and replaced with Harmony. Harmony increases direct healing by an additional 10%, and casting direct healing spells grants an additional 10% bonus to periodic healing for 10 seconds. Each point of mastery increases each bonus by an additional 1.25%. Healing Touch, Nourish, Swiftmend, and the initial heal from Regrowth are considered direct healing spells for the purposes of this Mastery. All other healing from druid spells is considered periodic.'

This is looking like a really great change, so hopefully it'll make it through testing to live. The old / current Mastery has some issues; though it's not too bad, it's much stronger in 5- and 10-mans, where HoTs can more easily line up with other heals. Probably the most frequent question I get is 'Should I be putting Rejuvs on my Wild Growth targets to activate the Mastery?', which really shouldn't be done unnecessarily (ie, on targets that don't need all that healing), so it likely ends up just encouraging spamming.

The new Mastery not only will boost our direct heals and encourage more direct healing, it's also a great boost to our direct heals and hence our tank healing as well as our raid healing. The mastery will proc off of Swiftmend too, so even if you're focussing on raid healing, you'll still be gaining the Mastery through your Swiftmends.

By the sound of it, it seems like it may proc a buff (increases periodic healing for 10 seconds), which would be nice if an actual buff comes up as that can be easily tracked with something like a Power Aura to make sure we maintain it, but we'll have to see. Either way, a very positive change!

Innervate changes
The Innervate changes slated for 4.2 so far are mostly nerfing Innervate's effect for OTHER healers. The effect when used on oneself will be the same - a 20% mana return. The change is when we cast our Innervate on someone else, it will now cause them to regenerate 5% of THEIR maximum mana.

Innervate: now causes the target to regenerate 5% of their maximum mana over 10 sec. Still regenerates 20% of maximum mana on self cast.

So this is basically just a nerf to Innervate trading. The Glyph of Innervate will be unchanged - if we cast it on someone else, we'll still receive half of our own Innervate (so 10%), but the other person will only get the 5% of their maximum mana rather than our 20%. If this change goes live, Innervate trading will basically be worthless as a mana strategy. It's still certainly viable for helping other healers when they're in need of mana, but trading the Innervates around won't be anywhere near as powerful as it is currently.

This is a slight buff to Feral innervates, though, as the Innervate on someone else will amount to 5% of the target's maximum mana (assuming that it is based on the target's maximum mana, which it appears to be), so Feral innervates will be slightly more useful now.

PTR Testing!
I've been hopping on the PTR for some of the raid testing. The new Firelands zone looks awesome inside - it's a massive space and it just looks great. We've tried out two of the bosses so far, Beth'tilac the spider boss and Lord Rhyolith. I won't go into too much detail on the fights yet, particularly as they're still subject to changing and tuning, but this should whet the tastebuds!

This is Beth'tilac. The fight itself looks like it will be pretty interesting, though it may be yet another fight that's bad for melee (and Rhyolith seemed bad for melee too, to be honest). The fight itself was ridiculously overtuned (mostly in Phase 2, where outgoing damage was ridiculous). The boss itself retreats up on top of her web when you engage. Some of the adds you deal with lower themselves down on webs, and you kill them to get a web vehicle which will transport raid members up on top of the web to engage the boss. Fortunately the web area is a normal platform - when I first heard about going into the webs in the Blizzard previews, I had a sudden fear that we'd be hanging upside down or something ridiculous. The upper web area though is a normal, fairly flat surface, though, so there aren't any weird swimming mechanics or camera angle quirks to it, which is great.

This is Lord Rhyolith. This will be a fight that ultimately requires a lot of coordination. He doesn't have a threat table (tanks will be busy rounding up adds), instead you attack his Left or Right Foot. DPSing either foot will cause him to turn in that direction, so you steer him around the area by DPSing the Left or Right foot, whichever way you want him to turn. He starts with an 80 stack of armour, which reduces his damage taken by 80%, so you have to steer him over volcanoes to melt the armour off and increase his damage taken. It looked like both feet share a healthpool, and supposedly his body will not be targetable (or at least not damageable) when this goes live - we were able to target it on the PTR, but it was obviously unnecessary to do so.

I'll leave it at that for now! As there may not be many screenshots of these bosses and Firelands things around yet, people are welcome to use my screenshots, but I ask that if you do so please link back to the blog for crediting. :)

Saturday, 30 April 2011

Raid Encounter Guides - Sinestra (Bastion of Twilight)


Sinestra, Consort of Deathwing, is the optional, Heroic-only end boss in the Bastion of Twilight. To even reach her you must kill Cho’gall on Heroic mode, which opens a trapdoor down into the deep cavern where Sinestra dwells with her eggs.
The Sinestra fight is both fun and challenging. The DPS check is extremely tight, which in turn makes the healing check fairly tight as well, as you will be hard pressed to run more than 5 or 6 healers. You will only need 2 tanks. Your healers will need to be able to dispel magic.
I’ll break this guide down into an Ability list, a simple breakdown of the phases, then a detailed look at some of the more critical aspects of the fight.
Abilities
Mana Barrier - Envelops the caster in a powerful barrier that continually replenishes any lost health, at the expense of the caster’s mana.
Flame Breath - Deals 95000 to 105000 Fire damage to all enemies in front of the caster.

Twilight Blast - Blasts an enemy for 166250 to 183750 Shadow damage
Wrack - Deals increasing Shadow damage over one minute. When dispelled bounces to two nearby allies of the afflicted player.

Twilight Slicer - Beam of concentrated twilight energy, dealing 50,000 Shadow damage every 0.3 seconds to any enemy in contact with it.

Twilight Pulse - Deals 27000 to 33000 damage every 0.5 seconds to enemies within 10 yards.
Twilight Extinction - Deals 475000 to 525000 Shadow damage to all enemies within reach.
Whelps
Twilight Spit - Spits Twilight energy at an enemy, dealing 3800 to 4200 Shadow damage and increases Shadow damage taken by 10%. Stacks.
Twilight Essence - Deals 9250 to 10750 Shadow damage to enemies within the bubbling Essence. Dropped by whelps the first time they die; revives any whelps who die within the pool.
Spitecallers
Unleash Essence - Releases a torrent of twilight energy that afflicts all nearby enemies, dealing damage equal to 10% of their maximum health every second.
Indomitable - Regains control through a surge of sheer will, becoming immune to all bonds and restraints until stopped. Deals 40000 Shadow damage to enemies within 10 yards and knocks them back.
Twilight Drake
Twilight Breath - Deals Shadow damage in a frontal cone.
Calen
Fiery Barrier - Protects nearby allies from dark magic, reducing their Shadow damage taken by 99%.
Essence of the Red - The blessing of Alexstrasza is applied to all allies nearby. Restores 5% of maximum mana per second. Grants 100% melee, ranged, and spell haste. Lasts for 3 minutes.
Pyrrhic Focus - Evelops the caster in a fiery aura that continually restores mana at the expense of the caster’s health.
Strategy
Phase 1
When you first engage Sinestra, she is afflicted by a debuff that causes her abilities to do 40% less damage and she begins the fight with 40% less HP. This first phase is primarily a DPS burn - Sinestra needs to be burned from 60% HP down to 30% as quickly as possible, ideally avoiding a third Whelp spawn and a second Wrack.
Sinestra’s primary ability is Flame Breath, a raid-wide AoE attack which she casts every 20 seconds. 
The whelps spawn every 50 seconds and should be picked up by the off-tank. Ideally you want to avoid a third whelp spawn. The whelps tend to aggro onto the healers, so it’s usually best for the OT to position near the healers.
You will get at least one Wrack during this phase. Wrack is a minute long debuff which needs to be dispelled off of afflicted targets well before this duration is up - this debuff applies increasing Shadow damage over time and will kill anyone affected long before the minute is up. When dispelled (or when the target dies, from Wrack or something else), the Wrack will jump to two other friendly targets. Careful control of Wrack dispels is crucial to avoid it getting out of control. It’s usually best to assign one person to handle dispels, with another as backup. Detailed discussion of Wrack is below.
You will also get 2-3 Twilight Slicers in this phase, so your raid needs to be positioned and prepared to deal with those. Detailed discussion of the Twilight Slicers is below.
Raid damage is pretty light in Phase 1 until the first Flame Breath, so any healers not worrying about tanks should DPS as much as they can in Phase 1, at least until that first breath goes out.
Phase 2
Phase 2 begins when Sinestra reaches 30% health. She will cast Mana Barrier on herself, healing herself to full. She will begin to cast Twilight Extinction, so it’s imperative the raid moves quickly to the back of the room to where the friendly NPC Calen has joined the fray. Calen will cast Fiery Barrier, and all raid members must ensure they are inside the barrier, as it will protect them from Twilight Extinction.
The whelps from Phase 1 should be brought to the back of the room with the rest of the raid and AoE’d down in a pile. The dead whelps will create a pool of Twilight Essence when they die the first time which will resurrect them - the respawned whelps need to be picked back up and AoE’d down again, ensuring they die outside of the pool. They will not create a puddle when they die the second time.
There are several things to deal with once the Fiery Barrier drops.
Spitecallers will spawn from the entry tunnel and will largely be handled by your melee DPS and the whelp tank. The Spitecallers will continuously try to cast Unleash Essence, which will very likely lead to a raid wipe if successfully cast, so a careful interrupt rotation needs to be in place. Ordinary interrupts (Kick, Mind Freeze, etc) can NOT be used though - detailed explanation on the Spitecallers is below.
Your range DPS (and possibly some melee) should head back to Sinestra and the two Pulsing Twilight Eggs on either side of Sinestra, the paths to which are no longer protected by fire. The range DPS should be DPSing Sinestra as soon as they can leave the Fiery Barrier to force her to remove the Twilight Carapace which protects the eggs to shield herself. DPS should be split evenly to kill the Eggs the second the Twilight Carapace is removed. DPS needs to be strong and fast to kill the eggs before Sinestra replaces the Twilight Carapace - if the Eggs don’t die before the Carapace is replaced, you will likely wipe. You may want to pot on the eggs to avoid Phase 2 wipes due to slow DPS. You should also try to maximize DPS time on the eggs, predotting while finishing DPS on Sinestra until she removes the Twilight Carapace from the eggs so that you can open full blast and already have DoTs ticking without losing DPS time on the eggs.
There will also be Twilight Drakes spawning in this phase which should be picked up by the Sinestra tank. These can be DPS’d after the Eggs die by the ranged DPS as the raid is getting back into position. The Drakes do a frontal cone but do not do much damage otherwise.
Spitecaller and Drake spawns are somewhat subject to RNG, and there can be a bit of luck involved in how many spawn. Fast DPS on the Eggs can also help to push past late spawns.
Healing is again light in this phase - your two tanks will need healing and a healer can also cast some heals onto Calen (who will be afflicted by Pyrrhic Focus). Unless an Unleash Essence gets off, there will be no other healing needed, so any healers with decent DPS should be assisting on Eggs or Spitecallers (Druids, Priests, and Shaman are generally best, whereas Pallies can remain on the tanks).
Phase 3 will begin when the two Eggs die.
Phase 3
Phase 3 begins when the two Pulsing Twilight Eggs are dead. Finish up any remaining Drakes and Spitecallers as she transitions and return to your Phase 1 positioning.
Phase 3 is the same as Phase 1 in terms of abilities - Sinestra will continue to cast Flame BreathWrack will be going out to the raid, Whelps will spawn, and there will be more Twilight Slicers to avoid.
Sinestra has healed herself to full, however, so she is back to full health and to full ability power - all of her abilities will now be hitting 40% harder than they did in Phase 1. It is imperative raid members be topped off before every Flame Breath or they will die.
To help with the increase in Sinestra’s health and damage, Calen casts Essence of the Red on the raid, granting 100% melee, ranged, and spell haste, and restoring 5% of maximum mana per second. This buff lasts for 3 minutes, and ideally you want to get Sinestra down to at least 20% health when this buff falls off.
Good handling of the whelps in this phase is important, as you will be getting many more waves than in phase 1. You will want to have members turn and kill the whelps before they get out of control to prepare for subsequent waves. It is helpful to have a Paladin as your OT for the whelps, as they can bubble off the stacks of Twilight Spit in between waves. You may also wish to have your OT and MT swap partway through phase 3 for the stacks to fall again.
Wrack must also be kept under good control. As of 4.1, Wrack avoids jumping to tanks, which is extremely helpful in controlling it (as it generally would need to be instantly dispelled off tanks in phase 3).
Wrack
It is crucial the Wrack debuff is appropriately handled throughout Phase 1 and Phase 3. It is generally best to assign one person to handle the Wrack dispels. It is useful for all healers to pick up a magic dispel to be ready as backup should the designated dispeller die or need assistance.
Wrack - Deals increasing Shadow damage over one minute. When dispelled bounces to two nearby allies of the afflicted player. If a person dies with Wrack on them, it will also bounce to two other raid members.
It’s best to keep Wrack on as few people as possible, so timing the dispels well is essential. You will need a way to see how long the Wrack debuff has been on a target for. For those who use Vuhdo, enter Wrack as a custom debuff and ensure ‘Alive Time’ is ticked. For those who use Grid, the addon GridStatusSinestra will monitor it.
The first Wrack of each set applied you ideally want to dispel at around 18 seconds. In Phase 3 especially, you will likely want to cooldown the target, with something like Guardian Spirit. For later Wracks and the Wrack jumps, you will want to dispel between roughly 10-18 seconds, dependent on Sinestra’s Flame Breath timer (particularly in Phase 3), the person’s HP, what class they are (and whether they have a personal cooldown to help mitigate it), what cooldowns are available to them, and how many Wracks are out.
It is extremely helpful to have one of your raid healers focus on healing targets with Wrack to ensure they are getting enough heals and that they are topped off before each Flame Breath.
As of 4.1, Wrack will avoid jumping onto tanks, which is incredibly helpful for managing Wrack. Should Wrack jump onto a tank in phase 3, they will likely need to be instantly dispelled, as the incoming damage will be too great to add a Wrack on top of that.
Spitecallers
The Spitecallers in Phase 2 are tricky adds to deal with. It’s crucial their cast, Unleash Essence, doesn’t get off. Normal interrupts and stuns do NOT work on the adds - if you try to interrupt with Kick, Mind Freeze, Pummel, or stun with a Hammer of Justice, Charge, Death Coil, etc, the Spitecaller will gain Indomitable - Regains control through a surge of sheer will, becoming immune to all bonds and restraints until stopped. Deals 40000 Shadow damage to enemies within 10 yards and knocks them back.
If the Spitecaller gains Indomitable, it will almost certainly get off a cast of Unleash Essence, which will lead to a lot of unnecessary raid damage and very likely lead to the whelp tank’s death (as the stacks of Twilight Spit could lead to a one-shot).
Instead, you need to use controls which break on damage to interrupt the cast. Some you can use are Gouge (Glyph of Gouge is extremely helpful), Blind, Death Grip, Hibernate, etc. (I don't particularly recommend Hibernate, as it has a cast time which is the same length as the Unleash Essence cast).
Gouge is most reliable for the interrupt used. Death Grips can be helpful as the adds spawn - it can whip the Spitecaller away from the entrance point, helping to make the next add spawned easier to target should the first Spitecaller still be up when the new one spawns.
Whelps
Whelps spawn every 50 seconds in Phase 1 and 3. Their main attack is Twilight Spit as well as melee hits, which in itself are not very hard, however the Twilight Spit causes a stacking debuff which increases Shadow damage taken by 10%. As more of these adds are up, the tank handling the whelps will take increasing damage. A paladin tank is very helpful on the whelps as they can bubble off the stacks.
When the whelps first die, they create pools of Twilight Essence, which deals Shadow damage to raid members standing in them and will resurrect any whelps dead in them. The pools are only created the first time the whelps die, so when they resurrect they should be moved outside of the pool to be killed a second time.
The whelps from phase 1 which are killed at the phase 2 transition should ideally be killed in the back as out of the way as possible to ensure the pool is out of the way. In phase 3 the whelp deaths need to also be controlled, ideally the first waves dying towards the back of the room and away from the raid. Generally ranged should be able to turn and kill the whelps when called for it. 
How you kill the whelps (AoE’d down at once or dropped in singles) and after how many waves each time comes down to your raid’s strategy, but ultimately it’s crucial the pools are kept as small and out of the way as possible.
Twilight Orbs/Slicers
Welcome to Cutters 4.0! 
Throughout Phase 1 and 3 Twilight Orbs will spawn and target random raid members. It is extremely important to note: The Twilight Orbs do NOT place a debuff on their targets! The orbs affix to their targets with a thin purple tether. The Twilight Orbs will spawn and within a few seconds tether to their target, then a large Twilight Slicer will connect between the two Orbs and the Orbs will chase their target. 
The two Orbs need to be kited away from the raid such that the Twilight Slicer doesn’t lop anyone’s head off (including the kiters). The two kiters will need to find a way to loop around each other so that they avoid killing each other and get back to their original position quickly to maximize DPS time. 
The Orbs themselves do Twilight Pulse, which deals 27000 to 33000 Shadow damage every 0.5 seconds to enemies within 10 yards, so both raid members and kiters need to get clear of the Orbs. They do not begin pulsing until about 5 seconds after they spawn.
If the tethered person dies for any reason - the Orb will retarget onto a high aggro target, usually a healer. The purple tether will not reappear - the Orb will simply drift towards its aggro target. The raid must be prepared should the original tether dies (though ideally they will not).
Positioning in Phase 1 and 3 can be the same and should be set up to maximize the space for the kiters. An L-shape is often successful or other various lines to allow raiders to move out and away before looping back to their original position.
Spatial awareness is critical for the Slicers as there is no debuff or other marker on Orb targets. The thin, purple tether to the targeted player is all there is to notify which is the Orb’s target, so players need to notice when and where the orbs are spawning, spot the tether, and adjust to avoid the orbs or to kite as necessary.
Good Luck and Have Fun!

Tuesday, 26 April 2011

Patch 4.1 Druid Changes and Resto Specs

Happy Patch Day everyone! 4.1 finally arrives this week! Be sure to open your launcher up early to download the patch and don't forget to update all of your addons.

The Resto Guide and Feral Guide are updated for 4.1, but I wanted to get this post up first for a nice summary of the changes as well as a look at the Resto talent tree changes.

Let's start by taking a look at the official patch notes for druids, before diving into some Resto spec options with the altered talent tree! Full patch notes can be seen on MMO-Champ here: Patch 4.1 Rise of the Zandalari Features.

Lacerate bonus threat has been removed and replaced with increased initial damage done.
Efflorescence has a new spell effect.
Enrage no longer increases physical damage taken.
Lifebloom's bloom effect has been reduced by 20%.
Prowl has a new icon.
Savage Defense has been redesigned slightly. Instead of a single charge absorption, it now places an absorption effect on the druid absorbing up to 35% of the druid's attack power (modified by mastery, if applicable) in damage and lasting 10 seconds. There are no longer any charges on the effect.
Stampeding Roar's duration has been increased to 8 seconds, up from 6. The movement speed effect has been increased to 60%, up from 40% and is no longer cancelled by cancelling shapeshift form.
Swipe (Bear) cooldown has been reduced to 3 seconds, down from 6, and is now on trainable at level 18 (training cost has been reduced). In addition, the bonus threat from this ability has been removed and replaced with increased damage done.
Swipe (Cat) damage has been doubled.
Thrash bonus threat has been removed and replaced with increased damage done.
Druids now innately have 100% pushback protection from damage while channeling Tranquility.
Balance
Starsurge damage has been reduced by 20%.
Solar Beam is now more responsive when enemies move into or out of it.
Feral
Berserk is no longer on the global cooldown.
Feral Swiftness now also causes Dash and Stampeding Roar to have a 50/100% chance to instantly remove all movement impairing effects from the affected targets when used.
Restoration
Gift of Nature (passive) also reduces Tranquility's cooldown by 2.5/5 minutes.
Efflorescence has been redesigned. It creates a healing zone at the feet of a Swiftmend target, but this healing zone now restores health equal to 4/8/12% of the amount healed by Swiftmend to the three most injured targets within 8 yards, every 1 second for 7 seconds. This periodic effect now also benefits from spell haste, but the individual ticks cannot be critical effects. In addition, Living Seed is no longer a prerequisite talent for Efflorescence.
Malfurion's Gift now reduces the cooldown of Tranquility by 2.5/5 minutes.
Nature's Swiftness now also increases the healing done by the affected nature spell by 50%.
Glyphs
Glyph of Rake is now Glyph of Pounce, which increases the range of Pounce by 3 yards.
Druid Bug Fixes
The troll druid models for Flight Form and Swift Flight Form has slimmed down to be more in scale with other druid flight forms.
Druids should no longer have UI issues after leaving a vehicle.


A lot of changes! I won't be going into detail on the Bear and Balance changes, though they've seen a few. Stampeding Roar has gotten a nice buff, with a longer duration and greater movement speed applied, however the range still hasn't been adjusted so that remains fairly small.

Feral cats see some nice new changes - Swipe damage has been doubled, making it much better for AoE attacks again (as opposed to tab-Raking, which had been a much more effective means of AoE for smaller add packs). Berserk is no longer on the global cooldown which is a very nice change. The talent Feral Swiftness has also been altered to allow Dash and Stampeding Roar to remove movement impairing effects, restoring some of the mobility to Ferals which was lost when shapeshifting was altered to no longer free you.

An important change for all druids too is that Tranquility now has 100% pushback protection - therefore it is no longer needed to pair Barkskin with the channel if you don't want to or can't without risking losing Tranquility ticks.
Image from Keeva's post on TreeBarkJacketEfflorescence Graphic Changed
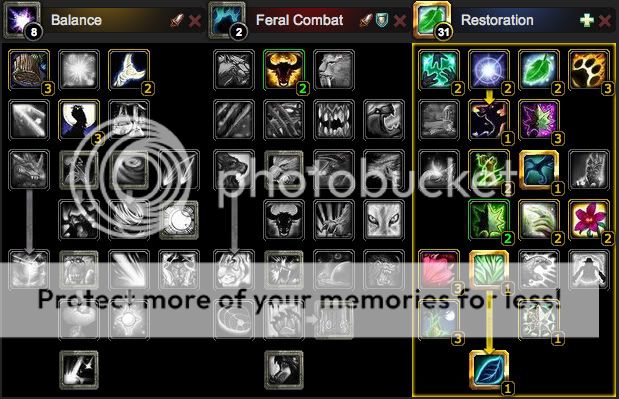
Resto sees several big changes in this patch. Efflorescence has a new spell effect (visible above) and has been redesigned - the healing is now 4/8/12% of the amount healed by Swiftmend to the three most injured targets within every second for 7 seconds, benefits from spell haste, but cannot crit.

Nature's Swiftness is also getting a slight buff, it now increases the healing done by the affected Nature spell used by 50%. When combined with Healing Touch, then, you'll see it heal for an additional 50%. This will hopefully make the spell more attractive for those who haven't taken it as well as a nice buff for those of us already using it.

One of the big changes coming to Resto is the reduced cooldown for Tranquility. Speccing into Malfurion's Gift will reduce Tranquility's cooldown to 3 minutes, bringing it in line with other raid cooldowns such as Power Word: Barrier and Divine Guardian. This looks set to make Tranquility the Resto druid's 'raid cooldown'. While I personally think a damage mitigation cooldown (or component) would have been a bit better (and also bring us in line with the other healers), this will undoubtedly still be a strong cooldown for Resto druids. Tranquility can be excellent and lifesaving in a fight and being able to use it multiple times per fight will be extremely helpful for Resto druids. This also gives us a bit more freedom with when we decide to use our Tranquility - often in a fight there are times you want to save the Tranq for a specific time, which may discourage one from popping it earlier when the raid may need it. The reduced cooldown will give us some more flexibility now in when and how often we use it. Combining Tranq with other raid cooldowns (especially, say, a Power Word: Barrier glyphed for increased healing received while under it) will also be extremely powerful measures for raids.

Resto Specs
The biggest change for Resto in this patch is to our talent tree, as Living Seed is finally unlinked from Efflorescence. This will theoretically free up a few points for many druids and also allow druids to take a full 3 points in Efflorescence (especially with its new effect) without being required to spend another 3 points just to get it. I had hoped that Living Seed itself would see a redesign, especially as many druids look set to drop it, but we'll have to wait on that point for now.

The big question now remains: Where do I put those spare points?

Regardless of where you decide to spend the points, two of those points will have to be within the first three tiers of the tree just to get you to the higher tiers - so you will be spending points in either Blessing of the Grove, Living Seed, or Perseverance. How you decide to spend them though will depend largely on what you're healing and your role. With this in mind, below are some sample specs you could try (for convenience sake, I have kept the Balance and Feral trees as 8/2, picking up mana saving talents):


All-around healing - 2 points in Blessing of the Grove, 1 point in Living Seed.
This is a pretty solid all around spec, picking up a point in Living Seed for its contribution to tank healing, 2 points in Blessing of the Grove for its contribution to raid healing. This spec also picks up Nature's Swiftness and, for those in need of a dispel, Nature's Cure.


Tank Healing - Picking up 3 points in Living Seed.
This spec continues to pick up 3 points in Living Seed for its contribution on dedicated tank healing, as well as picking up Nature's Swiftness.

Spell Damage - Taking points in Perseverance.
In this spec I've gone with the all-around spec, but moved the point in Nature's Cure over into Perseverance for the bit of reduced spell damage. A spec like this can be particularly nice for hard modes (particularly in 25 mans when dispels may be handled by other classes) to get that extra bit of damage reduction.

This last spec also starts to venture back into the other flexible points in the tree. Despite the buff to Nature's Swiftness, I imagine many may still shift that point elsewhere in the tree (particularly dedicated raid healers). Nature's Cure is also a potential candidate to move in situations (mostly 25 mans) where magic dispels are covered by other classes.

You can also pick up points in Nature's Bounty, such as in this spec:
Here I've combined the Rejuv boost in Blessing of the Grove, Swift Rejuvenation for the reduced Rejuv GCD, Gift of the Earthmother to help frontload those Rejuvs, and Nature's Bounty to reduce the Nourish cast times for spot healing on all those targets which have been Rejuved.

These samples give you an idea of the bit of extra flexibility we now have in the tree! As ever, much of your choices will come down to how you heal and your role in raids and 5 mans. You can also adjust the Balance and Feral trees as desired, though again, I've gone with the 8/2/31 basis with mana saving talents for simplicity and for broad use.

Tangedyn over at The Inconspicuous Bear made a very useful tool to help you decide where your talent points may be best spent based on each talents worth: Living Seed Replacement Talent. Simply by going through your Recount/Skada/World of Logs/etc healing percentage breakdown and looking at your points spent and raid buffed spell crit, his tool can help you evaluate where your free points would be best placed.


As ever, don't be afraid to play around with the different specs and see which ends up working best for you! While a treant is forever, a talent tree is as flexible as you need it!


Happy speccings!


Tuesday, 19 April 2011

Quick update and Al'Akir 25 Heroic vid!


I am still alive! It's been a while since I've posted so I thought I'd try to get a quick update up. The tricky thing I always find with brief updates is whether any of it is actually relevant (and, hence, readworthy)!

There hasn't been too much news of late, mostly just smaller content and item updates for the next patch. Patch 4.1 is still on the PTR, though it seems like we should be seeing that hit live servers within the next few weeks, possibly as soon as next week. I'll be updating the Resto and Feral guides for the upcoming changes when the patch goes live.

In more exciting news, we finished up the current content a couple of weeks ago, wrapping up with an Al'Akir 25 heroic kill after our Sinestra kill. Sinestra was quite a fun fight, particularly as for part of phase 3 you get a 100% haste buff and essentially infinite mana regen for a period of time, which makes for a lot of fun healing and DPSing! Though the tanks still get wrecked (along with the whole raid, really, as we also get increased damage taken that phase) so it's still edge-of-your-seat healing. It was nice to have a fight that wasn't really based around RNG, though. Al'Akir was a real pain for RNG, mainly as in Phase 1 you can easily have lightning, ice patches, a squall line, and wind burst all line up on one person - which for many is easily a death. If you can get out of phase 1 clean, you can pretty much get a kill (provided no one does anything too dumb), it's the same as normal mode from there out, just more health for Al'Akir and more damage taken.

I've been wanting to finish updating my raid guides (as many are still based off the beta previews) and maybe even get a Sinestra one up, so I'll be trying to make some time to do that. I think we'll be hitting up the PTR for the 4.2 Firelands raids when they're available though so hopefully I can have some mini-previews and screenshots of that when it's available.

As this post is pretty light, I'll leave you with a video made by our Bear tank Reesi (of The Inconspicious Bear) of our Al'Akir 25 man heroic kill. You can see the amazingness that is Phase 1 and our lovely spot up in front (I got to stack with the tanks)!

Tuesday, 22 March 2011

Mana Management as a Resto Druid

Battling Sinestra!

A quick update to start! Apologies for the lack of posts recently, I’ve been very busy still in game and in real life. We’ve been pushing progression hard these past few weeks but with some good results, we’ve gotten 25 Ascendant Council and Cho’gall down on heroic, as well as a quick Al’akir heroic kill on 10 man outside of raid hours to get a good look at the fight. We’re working full time on Sinestra now, which has been quite a lot of fun. The fight is pretty neat, and has a, er, fun version of Twilight Cutters - think Halion cutters that chase random raid members.
There’s also been a lot of news updates about Patch 4.1 on the PTR, but with how quickly that’s changing and updating, I’m best off pointing towards MMO-Champion for the latest updates rather than trying to rehash all the news.
Instead I thought I’d make a post about the most important thing for healers in Cata - mana management!
It’s a bit of a fallacy that Resto druids have no mana issues - we have to manage our mana as much as any other healer, and you can easily run OoM if you’re not careful. 
The most obvious tools in our mana-management arsenal are Innervate, Revitalize (talent), our Replenishment, and Omen of Clarity (which now only procs for healing spells when you spec into Malfurion’s Gift).
Let’s start with Innervate.
Innervate: Causes the target to regenerate mana equal to 20% of the casting Druid’s maximum mana pool over 10 seconds.
Innervate is our key mana-restoring tool. It’s generally best to use your Innervate early and often so you can make as much use of it as possible during a fight. Generally the best time to first pop it in a fight is when you are roughly 20% down on mana, so that 20% back is theoretically topping your mana pool off again (or close to it). You don’t want to pop it too early, though, as you don’t want to waste it if you’re topped off and it’s still ticking. After that initial use, you can generally use it on cooldown through the rest of the fight (with the exception, perhaps, of certain fights or mechanics which result in you regenning enough that the timing of your later innervates might be wasted).
There are also several tricks you can do to maximize the mana you get out of your Innervates.
Timing Innervates with Procs

Timing your Innervate with item or enchant Procs can provide substantial boosts to your Innervate, such as the Power Torrent proc (Increase Intellect by 500 for 12 seconds), the Mandala of Stirring Patterns proc (Healing spells have a chance to grant 1926 Intellect for 10 seconds), or the Engineer tinker use Synapse Springs (Increase Intellect by 90), etc! Our Innervate is based off of our Maximum Mana Pool when used - so syncing it up with these procs or other abilities (such as a Priest’s Hymn of Hope) which increase our mana pool will increase the size of the Innervate.
Addons such as Power Auras Classic can be extremely helpful in knowing when item procs are occurring to help you time your Innervates with them. Use your judgement though - all of these procs and uses have cooldowns, so there may be times where you simply have to use your Innervate before a proc simply because it cannot wait.


A quick Power Aura code for the Power Torrent is:
Version:4.9; icon:Ability_Paladin_SacredCleansing; buffname:Power Torrent; texture:172; alpha:0.7; isResting:0; inVehicle:0; spec1:false; combat:true; size:0.49; y:-50; ismounted:0


Just click 'import' on the Power Aura edit page (/powa) and paste that code in. That code will make a lightning bolt appear in the centre of your screen when the proc is up, but you can easily change that to suit your liking!


Trading Innervates (Update: Trading Innervates is no longer viable as of Patch 4.2)
If there are multiple Resto druids in your group you should see about trading Innervates. The Glyph of Innervate is key here - the Glyph gives you 50% of your Innervate’s effect when you cast it on another target. If you and another Resto druid are both Glyphed, by trading Innervates you each gain their full Innervate plus half of your own. This can go a long way in maintaining both of your mana throughout a fight. Be sure to communicate when you’re trading, particularly that first one, so you can each keep Innervating each other on cooldown!
You can also set up quite lengthy circles of Innervates, particularly if you have several Boomkins in your group. Generally the boomkins won’t need their own Innervates, particularly in raids with Replenishment. This frees up the Boomkins to Innervate you and other healers. If the boomkins or another Resto druid innervates you, that also allows you to Innervate another healer, helping your fellow healers out over the course of the fight as well. To simplify things over a course of a fight, it may be helpful for Innervate targets to be assigned, ie Resto druid Innervates Pally, Boomkin 1 Innervates Resto Druid, Boomkin 2 Innervates Priest, etc. 
If you do not have another Resto druid or a Boomkin in your group, the Glyph of Innervate can still be useful for you, particularly in situations where an Innervate might be needed on someone else. Another healer might be struggling, or a healer or mana-using DPS may have been Battle Rezzed and so almost out of mana - having your Innervate glyphed gives you that bit of extra flexibility to Innervate the person who’s in greater need without completely sacrificing your mana return should you need it.
Revitalize and Replenishment
Revitalize is an extremely important talent in the Resto tree. 
Revitalize: When you periodically heal with your Lifebloom or Rejuvenation spell, you have a 20% chance to instantly regenerate 2% of your total mana. This effect cannot occur more than once every 12 seconds. In addition, you grant Replenishment when you cast or refresh Lifebloom, which grants up to 10 Party or Raid members mana regeneration equal to 1% of their maximum mana per 10 seconds, lasts 15 seconds.
We have our own little mana battery in this talent, restoring mana through Revitalize’s main effect and also in granting ourselves and our party and raid members Replenishment.
It is extremely important that you maintain good uptime on Lifebloom. While Rejuvenation can also proc Revitalize, Lifebloom is much less costly in terms of mana spent, grants Replenishment, and also plays a key role in our Omen of Clarity procs (which I’ll cover next).
Omen of Clarity and Malfurion’s Gift
Patch 4.0.6 saw a change to Omen of Clarity and it will now only proc for healing spells if we spec into Malfurion’s Gift. It is now an essential talent in the Resto tree, do not forget to pick it up!
Malfurion’s Gift: Whenever you heal with your Lifebloom spell, you have a 4% chance to cause Omen of Clarity.
Again, it is extremely important to maintain Lifebloom on a target, ideally a 3-stack. Not only will it grant Revitalize and Replenishment, as detailed above, but it will grant the chance for Omen of Clarity to proc. Generally, the most likely target for a 3-stack of Lifebloom will be one of your tanks, most likely your main tank target if you are tank healing. Do not hesitate to maintain that stack on a tank even while primarily raid healing, though. If you are in a fight or situation where there is not a tank target for you to heal (healing Rohash/East platform in Conclave of Wind, for example), use your best judgement on who to heal, whether it be another raid member or yourself.
Clever use of Omen of Clarity procs is essential in your mana management. Healing Touch, Regrowth, and Swiftmend all consume OoC. Generally you don’t want to Swiftmend for an OoC proc as it’s a reasonably cheap spell. If there’s little other damage going out and so no reason to use a HT or RG, you may want to pop a SM on a target who needs it just so the OoC proc isn’t wasted. 
Healing Touch and Regrowth will be your most likely use OoC procs. If you are tank healing, Healing Touch will likely be your best use of your OoC as it hits hard enough for your tank heals. Use Regrowth on your best judgement. The best time for Regrowth OoC uses though is definitely in Tree of Life form - spreading Lifeblooms around the raid will be increasing your OoC proc chance, and ToL grants you instant Regrowths, so this will give you tons of instant free Regrowths to cast out on raid members.
Mana-Saving Talents
There are several talents we can spec into to help with overall mana cost. Moonglow is a very useful one which reduces the mana cost of our spells by 3/6/9%. This talent is in the Balance tree in the second tier. 
Furor in the first tier of the Feral tree is also a helpful talent which increases our maximum mana pool size by 5/10/15%. Our mana pool size affects our Innervate, Revitalize, and Replenishment, so this talent will help increase not only your mana pool size but those mana generating abilities as well.
Intellect
This is touched on above with Furor - our mana pool size affects our Innervate size and our Revitalize and Replenishment procs. This is part of why Intellect is such an excellent stat for Resto druids, particularly for regen.
 Although it may be tempting to gem for Spirit for the regen, favouring Intellect is the best course of action for Resto druids. Our in-combat regen tends to seem fairly low, relatively speaking - even on my main I’m at only about 2.6k in combat (self-buffed, mind), my other Resto druid who is in a mix of 333 and 346 gear is sitting at around 1.9k in combat self-buffed. It doesn’t seem like a massive amount, especially if you start comparing it to, say, a Holy priest, who may easily be hitting 3k+ regen in combat. The difference, particularly with Holy priests, is their talents boost their in-combat regen based on their Spirit specifically (Holy Concentration), which is why you may often see them favouring Spirit quite heavily.
Our mana regen is based largely on our Innervate, our Revitalize, and Replenishment, and Intellect will increase the effect of all of those. 
Healing and Planning
One of the biggest things in our mana management will of course be what heals we use and how we use them. Good use of our Omen of Clarity procs, covered above, is of course crucial to our healing and mana management. The use of the rest of our spells is also extremely important.
Lifebloom should always always always be up. If you don’t have a tank target to place it on, cast it on yourself or another raid member. It’s ok if it falls off - sometimes it can be quite useful to let it bloom, in fact - just be sure you put it back up right away. A 3-stack is best to keep up as much as possible. Many healing addons like Vuhdo and Healbot have HoT timers built-in which can help you keep track of your HoTs, though you can also find separate HoT timers or set up a Power Aura to let you know if your LB has fallen off.
One of the biggest issues that Resto druids seem to have today is moving past the Rejuv and Wild growth spam that proliferated during Wrath of the Lich King due to the nearly unlimited mana reserves. It is no longer feasible to simply continually spam Rejuv/WG. Don’t get me wrong, these two are extremely important spells in our healing arsenal. We just don’t have the mana to be able to spam them unnecessarily. While Pre-HoTing is still useful in certain situations (eg, you know a large quantity of raid-wide damage is about to hit), you can’t continually cover the raid and you can’t do so too far in advance. Our Rejuvs are of a shorter duration than they were in Wrath so you would have to refresh them more frequently, resulting in even more mana spent (and wasted). If the raid is fully topped with no incoming damage you are simply wasting mana on overheals. 
Similarly, many advise to use Wild Growth on cooldown - I prefer to advocate using WG on cooldown as necessary. The key is those last two words - as necessary. If the raid is taking constant AoE damage and 5+ raid members are always in need of heals, then it’s easier to use WG strictly on CD. If the raid is topped and there’s no incoming damage, spamming WG wastes not just mana but also the cooldown itself. As it’s a smart heal, it will hit those who are most injured, so it’s not really as feasible to pre-HoT with it (at least, not in 10- or 25-mans; in 5-man dungeons it will hit everyone in the party regardless). 
When AoE damage is expected, WG makes an excellent reactionary tool to hit right as that AoE damage hits. Keep in mind how Wild Growth heals as well - ‘the amount healed is applied quickly at first, then slows down as it reaches its full duration’ - so those quicker initial heals are best when applied for actual damage, rather than always pre-applied so only those final slower ticks actually have healing to do.
Overall, healing is much more reactive than it was in Wrath, so we need to be smart about when it’s viable to pre-HoT and when it’s more advisable not to.
As mentioned earlier, Regrowths are generally best saved for OoC procs, particularly in ToL form. The mana cost is very high for a spell which generally doesn’t hit too hard (especially if it doesn’t crit and you don’t have Nature’s Bounty), and you can easily spam yourself OoM if you’re only hitting Regrowths.
Don’t underestimate the value of Nourish. It’s a great spell for smaller damage, and if you’re, say, just keeping the tank topped off and refreshing his LB stack, Nourish is a great spell to do that. It’s so low cost that with LB up you can basically gain mana as you’re casting Nourish. Just be careful when tank healing that you don’t get caught flat-footed and miss a HT if you need that bigger heal!
Knowing the Fight
The best tool in your arsenal will always be knowledge. While there will be times when there’s unexpected damage (someone stands in something bad, RNG results in some bigger tank hits, etc), the majority of damage in fights is predictable and learnable. You know there’ll be bigger tank damage when a dragon does a breath, or heavy raid damage on something like Magmatron’s Incineration Security Measure. Learning fights and when to expect damage can help you plan which heals you need to use and when and can also help for planning your mana management throughout the fight. For example, if you know damage is light at the start of the fight, you can conserve a bit more so that you’re ready for a big burst of damage that may be coming in another minute or two. 
Also, knowing about how long the fight will last and what’s to come can help you greatly in planning your mana usage. If you have a ton of mana left and a very short period left in the fight, you can easily dump that mana and heal very aggressively. Similarly, if there’s a period of very low or no damage coming up that will give you time to regen mana (such as Magmaw when he is impaled on the spike), you can afford to spend more mana before that when you know you’ll have the opportunity to regen.
Tree of Life as a mana cooldown
This is an interesting strategy which I use in certain fights. Tree of Life is very effective as a healing cooldown (and even as a DPS cooldown if needing to help put some DPS into a boss) but it can also function as a mana cooldown of sorts. This is most effective in a fight that has pretty heavy AoE damage coming out in a mana-intensive phase. It can be very helpful for mana because ToL allows you to spread your Lifeblooms all over the raid to help heal up that raidwide damage, and Lifebloom is a much cheaper heal than Rejuvenation. Not only that, but the increased OoC procs from all of the LBs allows you to throw out those free instant Regrowths as well.
My best two examples of this are Valiona&Theralion and Nefarian phase 2, both fights when I use ToL for both the increased healing and for mana conservation. V&T can be a pretty mana intensive fight with all the raid damage that goes out, particularly on Heroic, so mana can easily get low when covering the raid. On V&T I tend to use my ToL form on a heavy damage phase when my Innervate is about halfway off cooldown, allowing me to recover some mana while throwing out those cheap LBs but still effectively healing the raid non-stop. 
In Nefarian phase 2 on the platforms, ToL can again be extremely effective in keeping the members of your platform healed by spreading LB all over them. It’s also much easier in that phase on Nef to keep multiple stacks of LB on each targets since there are much fewer people on your platform (as opposed to the full raid).
Pots!
Never forget the value of a potion! A personal favourite of mine is the Mysterious Potion, as it restores health and mana and is fairly cheap and easy to make (it requires Deepstone Oil, made from Albino Cavefish). This can be a great potion to use to get you both mana and health back. It does have a range so you can get unlucky with a low effect, but still a nice pot to have a stack of nonetheless. 
The most amazing potion though is definitely the Potion of Concentration. There’s a little bit of a drawback in that you have to sit and channel it, which puts you out of commission for 10 seconds (be sure to let the other healers know when you need to stop to use it!), but it restores a tremendous amount of mana. If you can use it, I definitely recommend it! Again, knowing the fight can be helpful here - knowing when there’ll be a period of low damage that will allow you to channel that potion. I also recommend popping Barkskin before potting to help mitigate any damage you might take.
Triage
Triage is extremely important and there will come a time where you have to make split-second decisions about who you heal and with what. Again, knowing a fight may help you with this - is there a certain class or raid member who needs to stay alive to perform a crucial role? (Perhaps that rogue needs to stay alive to interrupt). Can you afford to lose one of the tanks or is it essential they’re both kept up for a required tank swap? Is the boss almost dead, should you be focussing on the DPS to help burn that last few percent of HP, or do your fellow healers need help so the entire group lasts longer? Don’t forget to heal yourself too!
Generally these are the ‘oh shit!’ moments and decisions start happening on the fly. You won’t always make the right decisions, and they won’t always be easy - I’d certainly prefer no one die! But if it’s a situation between, say, a DPS dying and a tank, the DPS loss might lead to a wipe, but if the tank dies it’s generally almost guaranteed to lead to a wipe. 
While this is largely general healing advice, mana management does come into play as well as it will be affecting the choices you make on who you heal and which heals you use. It’s especially important towards the ends of fights when every healer is running low on mana. There are also times when people can (or, in the case of a fight like Chimaeron, must) sit at lower health - healthpools are very large and topping everyone’s health may not always be necessary. Again, knowing the fight can help here - if a big AoE damage spike is expected, your party members may need to be topped off, but if not, they may be just fine at lower HP for a bit!
Don’t stand in the fire!
Finally, spatial awareness, knowledge of fights, and personal cooldowns are important for everyone - that is to say, DPS and tanks as well as healers. If someone is standing in fire or poison or whatever else and just not moving out of it, it’s avoidable damage that you’re being forced to heal through (and burn through mana). 
Most classes now have personal damage reduction cooldowns (like Barkskin for all druids, Divine Protection for paladins, etc) they can use. It’s also important that tanks be using their damage mitigation cooldowns - you’d be amazed at just how many tanks don’t use any of their myriad of damage mitigation/reduction cooldowns and just expect healers to heal them through ridiculous damage.
I mention this last bit largely as a reminder that DPS and tanks have their part to play as well as the healers. Healer mana is limited, and any unnecessary damage taken by party and raid members (healers included too!) is mana wasted for the healers. 
I also bring this up as I’ve heard many healers getting discouraged, particularly in PuGs (oh, the joys of the LFG tool!). While it can be great practice (nothing teaches you to deal with healing crises better than a PuG that’s just pulled an entire hallway in Stonecore, for example), it can also feel very discouraging. It’s always good to examine how you handled the situation and think ‘could I have done something differently to prevent that person from dying or that wipe from happening?’ There are times though when people were simply standing in fire / standing in a frontal cone / inexplicably jumped off a ledge / DPS taunted the boss / so forth! I have noticed an increase in pressure on healers, as when people die or there’s a wipe for many the first thought is ‘wtf the healers messed up!’ This isn’t always the case, though, so don’t forget to look to see whether someone was standing in something they shouldn’t have been!
As always, good luck and have fun!